Bericht versturen
Huis
Producten
Ongeveer ons
Fabrieksreis
Kwaliteitscontrole
Contacteer ons
Vraag een offerte aan
Nieuws
guangqing(anhui)gas technologies co.,ltd.
Thuis ProductenDe Delen van het brandstofsysteem

De zwarte Gecodeerde van de de Cobrareparatie van Diapragm Impco Delen van het de Brandstofsysteem

China guangqing(anhui)gas technologies co.,ltd. certificaten
Ik ben online Chatten Nu

De zwarte Gecodeerde van de de Cobrareparatie van Diapragm Impco Delen van het de Brandstofsysteem

Black Coded Diapragm Impco Cobra Repair Fuel System Parts

Grote Afbeelding :  De zwarte Gecodeerde van de de Cobrareparatie van Diapragm Impco Delen van het de Brandstofsysteem

Productdetails:
Plaats van herkomst: De V.S.
Merknaam: IMPCO
Modelnummer: Rk-cobra
Betalen & Verzenden Algemene voorwaarden:
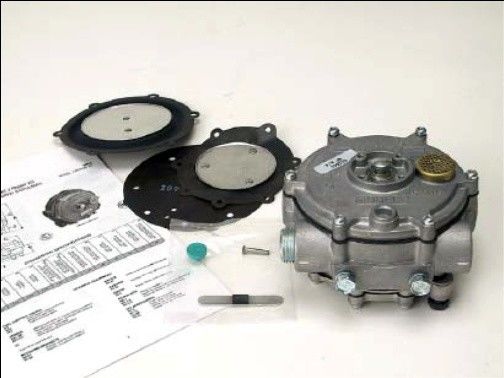
Min. bestelaantal: 24
Prijs: Depending on quantity
Verpakking Details: Karton
Levertijd: 8 weken
Betalingscondities: T/T
Levering vermogen: 1200pcs per 8weeks
Gedetailleerde productomschrijving
Productnaam: Reparatieuitrusting artikelnummer: Rk-j
merk: IMPCO Diafragma: (Zwarte) Hydrin
Hoog licht:

RK de Uitrusting van de de Cobrareparatie van COBRAimpco

,

De gecodeerde Uitrusting van de de Cobrareparatie van Diapragm Impco

,

De Delen van het de Brandstofsysteem van de cobrareparatie

IMPCO RK-J , Model J Regulator Repair Kit , Black Coded Diapragm
 
The IMPCO PPI-3 repair kit instructions will provide the technician information to successfully repair the Model J regulator converter. Always inspect the major casting pieces for damage, corrosion or cracks before attempting a service repair. Be sure the repair kit part number you are using is correct for the regulator being serviced. Diaphragm is BLACK - Hydrin diaphragm material is the standard material and is well suited for the most common applications
 
 
De zwarte Gecodeerde van de de Cobrareparatie van Diapragm Impco Delen van het de Brandstofsysteem 0
 
REBUILD INSTRUCTIONS
De zwarte Gecodeerde van de de Cobrareparatie van Diapragm Impco Delen van het de Brandstofsysteem 1
1. Under normal conditions, installation of a complete Model J Repair Kit should be necessary only at the time of a major engine overhaul or when the converter has been out of service for an extended period of time. Each kit includes the necessary gaskets, diaphragms, seals and some replacement screws.
De zwarte Gecodeerde van de de Cobrareparatie van Diapragm Impco Delen van het de Brandstofsysteem 2
 
2. Remove the 6 screws (2) from the secondary cover assembly (3).
NOTE: Identify type and location of screws removed (i.e. Torx) to ensure the same type and size screws are returned to the correct locations during reassembly.
De zwarte Gecodeerde van de de Cobrareparatie van Diapragm Impco Delen van het de Brandstofsysteem 3
3. Loosen the secondary cover (3) by tapping around the circumference with a plastic screw driver handle.
 
De zwarte Gecodeerde van de de Cobrareparatie van Diapragm Impco Delen van het de Brandstofsysteem 4
4. Remove the secondary cover (3) and secondary dia-phragm (4) as a unit. Note the secondary lever (6) pro-truding through the metal tab slot of the secondary dia-phragm. Slide the cover and diaphragm toward the gas inlet to free the lever from the slotted tab of the dia-phragm. Take care not to bend the lever.
De zwarte Gecodeerde van de de Cobrareparatie van Diapragm Impco Delen van het de Brandstofsysteem 5
5. Remove the screw (5) retaining the secondary lever fulcrum pin.
 
De zwarte Gecodeerde van de de Cobrareparatie van Diapragm Impco Delen van het de Brandstofsysteem 6
6. Remove the secondary lever (6) and fulcrum pin (7). Set aside fulcrum pin for reassembly. Remove the secondary spring (9).
De zwarte Gecodeerde van de de Cobrareparatie van Diapragm Impco Delen van het de Brandstofsysteem 7
7. Turn the converter over. Remove the seven screws (20) and lift off the primary cover (19).
 
De zwarte Gecodeerde van de de Cobrareparatie van Diapragm Impco Delen van het de Brandstofsysteem 8
8. Remove the primary diaphragm (18).
De zwarte Gecodeerde van de de Cobrareparatie van Diapragm Impco Delen van het de Brandstofsysteem 9
9. Remove the primary valve pin (17) and spring (16).
 
De zwarte Gecodeerde van de de Cobrareparatie van Diapragm Impco Delen van het de Brandstofsysteem 10
10. Remove plate (14) and the gasket (13).
De zwarte Gecodeerde van de de Cobrareparatie van Diapragm Impco Delen van het de Brandstofsysteem 11
11. Remove the gasket (13) from the plate (14). Clean plate as needed to ensure a good seal with a new gas-ket.
De zwarte Gecodeerde van de de Cobrareparatie van Diapragm Impco Delen van het de Brandstofsysteem 12
12. Remove the primary seat (12). Clean covers (3, 14, & 19), body (10) and all other metal parts as necessary with a safety solvent as needed and allow to dry prior to reassembly. Do not use harsh solvents such as brake or carburetor cleaner on any of the non-metallic components as they will damage the material.
De zwarte Gecodeerde van de de Cobrareparatie van Diapragm Impco Delen van het de Brandstofsysteem 13
13. Install new primary seat (12).
 
De zwarte Gecodeerde van de de Cobrareparatie van Diapragm Impco Delen van het de Brandstofsysteem 14
14. Set new plate gasket (13) on the plate (14). The pri-mary pressure hole in the gasket must line up with the hole in the body cover plate as noted in the photo at left.
De zwarte Gecodeerde van de de Cobrareparatie van Diapragm Impco Delen van het de Brandstofsysteem 15
15. Place the plate (14) and gasket (13) on to the body (10) and align the screw holes.
De zwarte Gecodeerde van de de Cobrareparatie van Diapragm Impco Delen van het de Brandstofsysteem 16
16. Insert the new primary valve pin (17) through the spring (16) and insert into the plate (14) with the larger diame-ter end of the spring resting against the plate.
De zwarte Gecodeerde van de de Cobrareparatie van Diapragm Impco Delen van het de Brandstofsysteem 17
17. Set the primary diaphragm (18) in place on the plate (14). Line up the screw holes to the plate.
 
De zwarte Gecodeerde van de de Cobrareparatie van Diapragm Impco Delen van het de Brandstofsysteem 18
18. Carefully place the primary cover (19) over the dia-phragm (18). Hand-thread the screws (20) through the cover and plate (14) into the converter body (10).
 
De zwarte Gecodeerde van de de Cobrareparatie van Diapragm Impco Delen van het de Brandstofsysteem 19
19. Tighten the screws (20) to 37-43 in-lb. (4.2-4.9 N•m) in a criss-cross pattern.
 
De zwarte Gecodeerde van de de Cobrareparatie van Diapragm Impco Delen van het de Brandstofsysteem 20
20. Assemble the new secondary seat (8) and new sec-ondary lever (6) by inserting the seat retaining tip to the end opening of the lever as shown. Be sure the new seat properly locks into place.
 
De zwarte Gecodeerde van de de Cobrareparatie van Diapragm Impco Delen van het de Brandstofsysteem 21
21. Position the secondary spring (9) in place on the body (10). Place the secondary lever assembly (6 & 8) into place over the spring (9).
De zwarte Gecodeerde van de de Cobrareparatie van Diapragm Impco Delen van het de Brandstofsysteem 22
22. Hold the lever assembly (6 & 8) with the fulcrum pin (7) in place in its locating groove and fasten in place with the retaining screw (5).
De zwarte Gecodeerde van de de Cobrareparatie van Diapragm Impco Delen van het de Brandstofsysteem 23
23. Tighten the screw (5) to 29-35 in.lbs. (3.3-4.0 N•m).
 
De zwarte Gecodeerde van de de Cobrareparatie van Diapragm Impco Delen van het de Brandstofsysteem 24
24. The end of the secondary lever (6) should be 1/32" be-low the level of the body casting (10). Use a straight edge to measure. Remove and gently bend the lever if necessary to obtain the correct height.
 
NOTE: Bending the lever while installed may result in damage to the seat (8). Remove the lever from the body, bend, reinstall, and then re-check the height.
De zwarte Gecodeerde van de de Cobrareparatie van Diapragm Impco Delen van het de Brandstofsysteem 25
25. Align the secondary diaphragm (4) to the secondary lever (6) as shown. The end of the lever must protrude through the tab slot on the bottom of the new dia-phragm (4) after installation. The gap from which the link is punched should be located toward the gas inlet.
 
De zwarte Gecodeerde van de de Cobrareparatie van Diapragm Impco Delen van het de Brandstofsysteem 26
26. Install the secondary cover (3) with the six screws (2).
 
De zwarte Gecodeerde van de de Cobrareparatie van Diapragm Impco Delen van het de Brandstofsysteem 27
27. Tighten the screws (2) in a crisscross pattern to 29-35 in-lb. (3.3-4.0 N•m), to complete the installation of the repair kit components.
 
De zwarte Gecodeerde van de de Cobrareparatie van Diapragm Impco Delen van het de Brandstofsysteem 28
28. Attach a 100 psi air pressure hose to the regulator "IN-LET" fitting.
De zwarte Gecodeerde van de de Cobrareparatie van Diapragm Impco Delen van het de Brandstofsysteem 29
29. For models with a primer button: Depress the primer button several times. Air flow should be detected when the primer is depressed.
NOTE: Not all models include a primer button. Skip this step for models without a primer button.
 
De zwarte Gecodeerde van de de Cobrareparatie van Diapragm Impco Delen van het de Brandstofsysteem 30
30. Check the primary cover for leaks using liquid leak de-tector solution.
 
De zwarte Gecodeerde van de de Cobrareparatie van Diapragm Impco Delen van het de Brandstofsysteem 31
31. Make sure one of the regulator's secondary outlets is plugged. Draw a bubble of leak solution over the other regulator outlet. The bubble should hold for several se-conds when the regulator is pressurized. If any leaks are found, the regulator must be replaced. If no leaks are found, the regulator can be reinstalled and returned to service.
De zwarte Gecodeerde van de de Cobrareparatie van Diapragm Impco Delen van het de Brandstofsysteem 32
 

Contactgegevens
guangqing(anhui)gas technologies co.,ltd.

Contactpersoon: Mrs. Carrie Liu

Tel.: +86 13855195806

Fax: 86-551-63664756

Direct Stuur uw aanvraag naar ons (0 / 3000)